


The light was perfect. I suddenly remembered where I'd left the charger - 3000 miles away.
Everyone's had this experience, or the similar experience of spending one's vacation searching for a cellphone charger for someone.
Here's how to charge any battery enough to keep doing the important stuff.
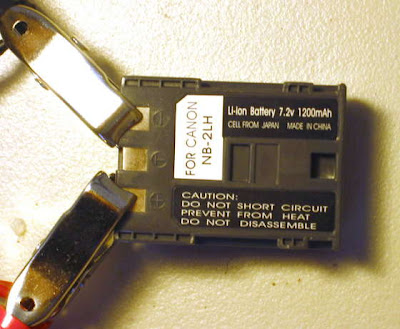
This is the battery to my Canon S30. It's got three terminals, labeled "+", "-", and "T".
I've clipped alligator-clips onto the two obvious ones.
You don't need clips, you can just hold wires on it for as long as it takes to charge, that's probably better anyway, so you can tell if anything is going wrong.
Warning! Wear eye protection and if anything weird happens don't breathe the fumes!
step 1Hands on Charging
What was that other terminal marked "T" for? TIMMY of course, just like in the nursery rhyme!
It's for Timmy to check how hot the battery gets when you charge it.
Actually it's "Thermistor" or similar names. Temperature sensor. To see how hot the battery gets when you charge it.
Instead of a computer to keep track of temp, weve got a Timmy handy to hold his finger on the battery. If it gets hot you're doing something wrong.
"Digital sensor, huh?" would be a running joke back when Americans knew Greek and knew that digits are fingers. But then numbers got so much use we forgot about counting on fingers, and now people barely know how to do anything with their hands.
Anyway, here's a finger used as a digital thermometer. Which reminds me of the joke about the doctor...

step 2Current and Voltage
Want to be totally mystified? Look up "battery charge control".
Add keywords like "li-ion" for further obfuscation.
That stuff is important if you want to fully charge your battery, make it survive many charge cycles, or avoid lawsuits.
We just want to take pictures or talk on the phone. So here's what we do:
Go find a dc powersupply. Nice ones usually live next to people with names like "electronics guy". If you can find one like this that displays current and voltage, it's really easy.
If you can't, there's still hope, hang in there til later.
Turn the current and voltage knobs all the way to the left. Turn on the powersupply and
hook it up to your battery, bearing in mind that red and black wires can possibly be plugged into the wrong sockets. Read the labels and unplug anything that seems to be arcwelding on your battery.
Turn up the voltage and current limit knobs until 500 milliamps (0.5 amps) is flowing into your battery. If you feel like being careful look up how much current the experts use.
But half an amp for a few minutes won't damage any battery that's big enough for a modern camera or phone.

step 3Time Limit
We're not going to fully charge the battery because we don't know how, and we're in a hurry.
We're just going to charge it enough to go back to our regular jobs. The phone or camera will tell us roughly how charged the battery is after we start using it.
So we're only going to charge it for ten minutes or so.
This battery has 1200 milliamp/hours of capacity. So if it's fully discharged and we charge it at 500 milliamps per hour, it would take more than two hours to fully charge it.
Some types of batteries can be badly damaged by overcharging. Some are just damaged a little.
Here's how my golf cart avoids overcharging. There's a built in appliance timer that turns off the charger automatically. It won't let you charge for more than 24 hours without re-setting.

step 4Christmas Tree Lightbulbs as Improvised Current Regulators
If you can't find a nice variable powersupply like our electronics guy has, you can still charge
a battery.
Hopefully you own an electrical meter.
Find a source of DC electricity. Look at the voltage of your source, the voltage of your battery, and use Ohm's law to figure out what kind of resistor you need to put between the two to get the right current to flow. Then go find that resistor. A piece of a heating element from a toaster or hair dryer can work. That clothes iron in the photo worked for a certain battery and a certain dc source.
The best improvised current regulator is usually a small lightbulb. The bulb is great because the resistance goes way up when the filament gets hot and limits the current. And you can only put an amp or so through one of these without burning it out, so it acts as its own fuse. And they're free gifts from garbage Santa.
Here I'm using two bulbs in series to limit the current going into a gelcell. Use your multimeter to measure what current goes through your bulb at different voltages. Or you can just cowboy it and use one tiny bulb for a few minutes, while feeling to see if the battery gets hot or not.
Wear eye protection and don't breathe the fumes!


0 comments:
Post a Comment
Did you like this page? If so , you have several options to see her again. The first is press Control D to add to your favorites. The second is subscribe by email to receive our updates. The third is add our RSS FEED the reader of your choice. The fourth, follow us on Twitter. The fifth option is to enter our interactive network through Google Buzz. And the most recent option is to join the official site our community on Facebook real -time for our images free of charge.