


 this is an attempt to make a tutorial for making your own iron age/viking shoes. i don't have a pattern for these; i learned to make them by using my own foot as a template. therefore, all the measures given here are highly approximate. if your foot diverges a lot from mine (size 39, long and narrow/slender), some sewing experience might come in handy. that said, there's no reason to be too specific in making these. as you can see, the 'laces' can be loosened or tightened to fit, and the basic idea is really very simple.
the picture above is of my own, good old shoes, made in 1997. i always use them with these thick, felted socks inside; to me, they're part of the shoe. they are soft, comfy and i simply love them. based on my original 11 year old, several times altered, water damaged drawing, i have made a kind of template as a sort of guideline - sort of. you'll find it at the bottom of this post. i had to scan it in two operations as it was so big, then paste the parts together on my computer, so this adds to the imperfection. you should go for the thick, black lines and not pay too much attention to the rest :)
 by following the description, you should end up with something that looks like this (above. never mind the red dots in the picture - they will be explained later). the uncut shoe is my left foot (wrong side out), but the cut, dark one is my right foot shoe (right side out). (i'm sorry for the bad quality photos. i don't know what's wrong with my camera - the top photo was taken about two years ago; crisp, clear and fine. all the photos i take these days come out pale and grainy).
 look through all the photos before you start drawing!
you start by purchasing some good leather about 2,5 - 3 millimeter thick. thinner than this will be like wearing a thin but stiff plastic cover on your foot. not good.
start with drawing a line around your foot.
 then mark the center point under your forefoot; the part that you use to kick off when you walk. (wow. pay attention. more bad english will follow). using a ruler, draw a vertical line through this as shown.
 draw another line under this one. using my foot as a measure, this will be approximately 2,5 centimeters below the first line. yours might be different, but take a look at where the line is placed on the foot; just below the big knuckle on the inside of your foot. the top line is just above it.
 draw a line about 1 cm outside the foot line, around the toe area. omit the bumps (your toes...)
 mark several points about 5,5 cm outside of this again. draw a line through the points (i forgot to do it at this point and did it later on, see below. it's hard making a tutorial; you have to think in logical steps instead of doing the messy thing you usually do!) .
 draw the heel cap, about 2 cm wide and 4 cm long. mark three lines (the dotted red lines) - these points mark the end of the heel part (the bottom line), and also between the 'ears' that comes next (the two upper lines). again, there is little point in giving measures here, but look again at where the lines are placed on the foot. and remember it's all very approximately. the shoe can be made with both two or three 'ears'. these are made with three. if you're good at eye measurements (?), this step can be omitted completely.
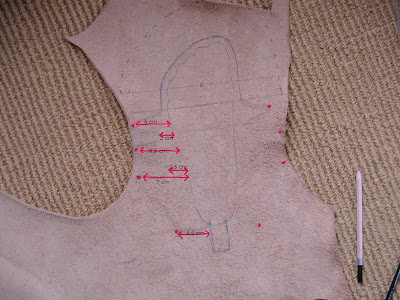 here comes the free hand drawing. sketch up the 'ears' using a soft pencil. i have given measures here; again, only guidelines. i have marked the outer most point of the ears with red dots. you can (barely!) see here where the three lines from the previous photo are; in between the three ears, and at the end of the heel ear.
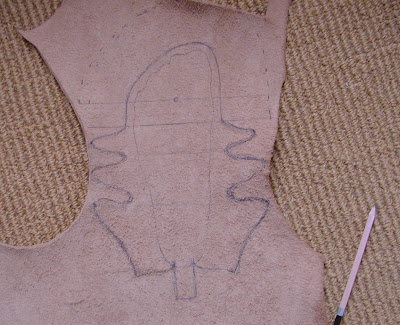 when you are happy with your drawing, make a more solid line.
 the next step can also be omitted, but is helpful as a visual guide: using a ruler, draw a fan from the middle point of your forefoot to the line you made 5,5 cm outside your toes. in addition, you will draw lines in the 2,5 cm area below the toe area, as shown. this will be the 'fingers' that wraps around your toes. as you can see from picture #2, there is some space between some of the 'fingers' in the top section of the fan. there's no rules to this; the point is just to make them fit nicely around your toes. the only thing i would make sure of, is not to cut the fingers slimmer than 1 cm. but differing somewhat from each other in size is not a problem.
 start cutting.
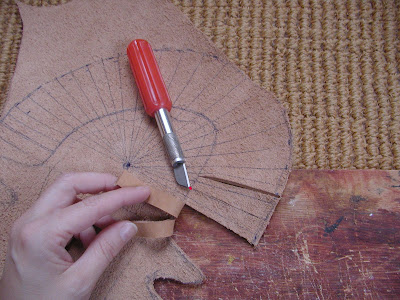 and here's why drawing the fan can be omitted (at least by me); you might just decide to ignore the lines while cutting. but they're good as a visual aid. cut he fingers up until the 1 cm line, as shown by the red dot at the tip of the knife.
 cut the fingers so that they seem functional, with a little space between some of them. you might wish to round off the tip of the fingers just a little by cutting the corners, but this is optional.
in this picture, i have tanned the leather, rubbed it with beeswax, and punched holes in each finger, ear and along the heel cap(s). EDIT: i'm lying. there's no holes in the heel caps. go back to picture #2, click to enlarge, and use the red dots as a guideline to making the holes. i also realise that there's no pictures of the heel cap with string. i'll be back with that. EDIT: part 2 of this tutorial has been added here.
 draw a leather string through the holes as shown here and in picture #1, and try the shoes on (preferably on your own foot :) )
the worst mistake you can make is cutting the length too short (too long is not a problem; just cut the heel to fit) or make the fan fingers too short so it won't wrap around your toes. if this is the case, sell them to someone with a smaller foot and try again :)


 pull your leather string through the two bottom holes in the middle section, as shown, so that the string have equal lengths on both sides of the cap. i cut my own leather strings, but you can buy pre cut strings for this.
 then, from the inside, pull the string through
  push the string through
  then 'sew' back through side flap hole nr 3 and middle section hole nr 4; pull tight and it will look like this:
 repeat on the other side and cross the strings:
 cross again on the inside of the cap, and pull through the last two holes. inside view:
 tie a knot, and you're done.
 (the front part of the shoe is 'unstringed' in this picture, that's why the sides are sticking out.)


